Quarantine Has You Bored? Check out These DIY Home Projects with Maker Pipe
If you’ve exhausted your lists of things to keep you entertained during quarantine, you may be at a loss for what to do next. People across the globe are in similar situations and are turning to craft rooms and tool sheds to unleash their creative skills.
Quarantine is an excellent time for you to get busy building things and learn how to make fun stuff. Maker Pipe structural pipe connectors can help you create amazing DIY projects, so we have collected a few of our favorite simple builds for you to try at home.
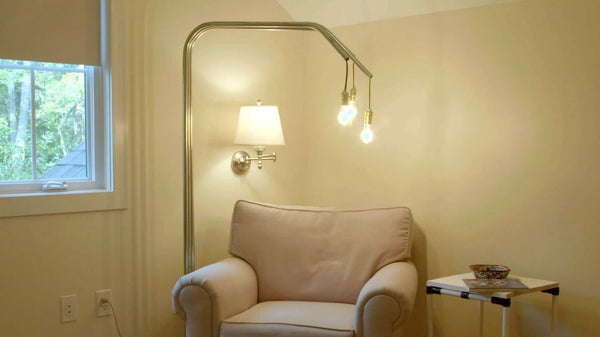
Build a Rustic Side Table
Quarantine is a great opportunity to give your home a style update. There are hundreds of quick and easy DIY projects for your home, including this stunning rustic side table. Use reclaimed wood to give the table an on-trend industrial rustic style.
To build one rustic side table you will need:
- 4 22” lengths of EMT conduit
- 6 15” lengths of EMT conduit
-
4 90-degree structural pipe connectors
-
2 T-connector pipe fittings
- 15”x15” piece of timber (reclaimed wood or hardwood)
- 15”x15” piece of timber with 1” cut off diagonally at each corner
- Black shrink wrap (optional)
-
1 caster kit or end plugs (optional)
- If you are using the shrink wrap, apply it with a heat gun before assembling the table.
- Build the frame using the 90-degree connectors to make a square with four of the 15” lengths of conduit and attach the 22” lengths to form the legs.
- Place the T-connectors 3” from the bottom of the legs and attach the remaining conduit to create support struts.
- Secure the piece of timber with the corners removed to the support struts using the conduit hangers to form a bottom shelf.
- Secure the 15 x 15 piece of timber to the top of the frame using the hangers to form the tabletop.
- Add the casters to the bottom if using or place the end plugs in the bottom of the legs.

Create a Learning Center for the Kids
After the schools closed, parents across the country and globe found a new appreciation for their kids’ teachers. You can make homeschooling your kids fun and easy by building your little ones their own learning center.
For a 6’ learning center to accommodate two to four children, you will need:
- 2’ x 6’ pegboard
- 20” x 6’ piece of plywood
- 4 25” lengths of ¾” EMT conduit
- 2 20” lengths of ¾” EMT conduit
- 2 6’ lengths of ¾” EMT conduit
- 4 ¾” conduit hangers
- 4 90-degree elbow pipe connectors
- 4 rubber chair feet
- Create an open rectangular box frame by using the 90-degree connectors to attach the 25” lengths of conduit to the 6’ and 20” lengths and securing them with the hardware provided.
- Add the rubber stops to the bottom of the 25” lengths to create non-slip table legs.
- Use the conduit hangers to secure the tabletop to the box frame.
- Either mount the pegboard to the wall behind the desk or attach the pegboard to the tabletop using a bracket.
- Use pegboard hooks, shelves, and baskets to customize your child’s learning space with supplies.
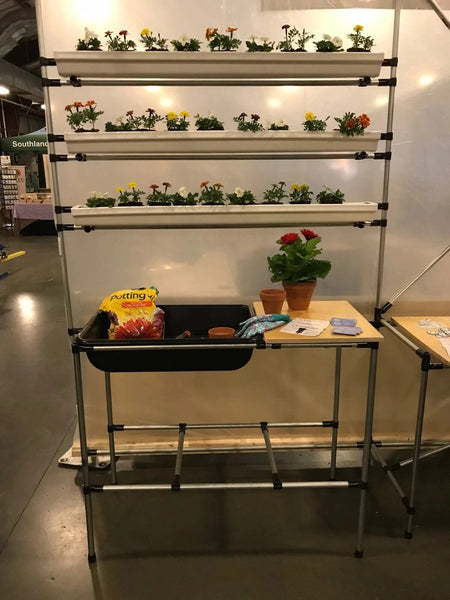
Cultivate an Indoor Garden
As the stock on supermarket shelves dwindles, there was never a better time to cultivate your own indoor garden. This simple lightweight shelf is an excellent place for starting seeds or growing fresh herbs, and you can use materials that you can find around your home.
To build a light table, you will need:
- 5 45.5” x 24” lengths of plywood
- 10 4’ lengths of ¾” EMT conduit
- 10 2’ lengths of ¾” EMT conduit
- 4 7’ lengths of ¾” EMT conduit
-
20 90-degree elbow pipe connectors
- 20 ¾” conduit hangers
- Self-adhesive red/blue LED light strips
- 4 rubber chair feet
- To build the frame, attach the two 4’ lengths of conduit and two 2’ lengths of conduit to the four 7’ lengths using four of the 90-degree connectors to form a tall open box frame.
- Measure and mark 12” from the top of the frame and place four 90-degree connectors to attach another two lengths each of 4’ and 2’ conduit. Repeat this step measuring 12” down from your previous marks. These structures will form your shelves.
- Measure and mark 24” down from the previous mark, and secure four more 90-degree connectors then attach 2 lengths each of 4’ and 2’ conduit. This will form your potting bench.
- Measure and mark 33” down from your potting bench and place the remaining 90-degree connectors and 4’ and 2’ lengths of conduit to form the base for your storage shelf. Add the rubber feet to the bottom of your frame.
- Secure the plywood boards to the shelf and bench frames using the conduit hangers.
- Place two LED strips on the underside of the top two shelves and you are ready to start growing your indoor garden.

DIY Photography Lightbox
If you are capitalizing on your new-found extra time by taking up a hobby like photography, this DIY lightbox is a great way to get professional-looking pics to post on your Instagram feed.
To build a lightbox, you will need:
- 8 24” lengths of ¾” EMT conduit
-
4 90-degree elbow pipe connectors
- A thin white cotton sheet
- 2 large sheets of white poster paper
- 2 bendable desk lamps with white bulbs
- Begin by creating an open cube structure using the 90-degree connectors to attach the lengths of conduit, securing with the provided hardware. The frame should look like a table without a top when you are finished.
- Attach the poster paper to the back of the frame using hot glue and place the frame on top of the second sheet of paper.
- Cut the sheet into an 80” x 30” length and drape over the top of the frame.
- Position the desk lamps approximately 6” away from the sheet and place the item to be photographed inside the frame.
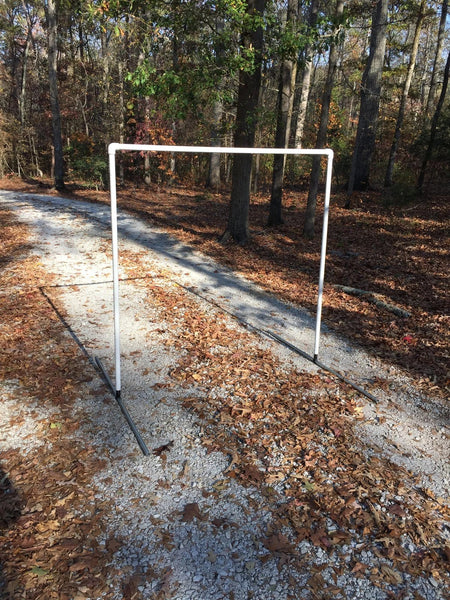
Host a Movie Night
With the cinemas closed, you can bring the magic of the movies to your home with this simple DIY projector screen. Whip up some movie snacks and gather the whole family in the backyard to stream one of your favorite film classics or check out the latest theatrical releases streaming online.
To build a 5’x6’ projector screen, you will need:
- 3 6’ lengths of ¾” EMT conduit
- 2 7’ lengths of ¾” EMT conduit
- 4 T-connector pipe fittings
- A white bed sheet or a 5’x6’ sheet of white canvas
- Zip ties
- To construct the projector screen frame, connect one 6’ length of EMT conduit to the two 7’ lengths using the T-connectors.
- Measure and mark the center of the remaining two 6’ lengths of conduit and attach the remaining two T-connectors to the mark and secure. Attach the 7’ frame to the vertical openings in the T-connectors.
- Stretch the bed sheet or canvas taut across the frame and secure at the corners and several points along the edge of the frame with the zip ties. Position your projector, and you are ready to host the perfect family movie night.
The Takeaway
Don’t let quarantine get you down. Channel your time and energy into creating some of these fun and exciting DIY projects. Maker Pipe structural connectors are simple and easy-to-use so you can get the whole family involved in building projects and creating memories.
For more inspiration for DIY projects to pass the time during quarantine, browse our build ideas on our website, and contact us at (843)-245-9747 to find out more about the range of modular pipe connectors we have available.


