Simple DIY Patio Furniture for Summer
Summer is here, and you know what that means! It’s time to stretch out and soak in the sweet summer sun. Time to unwind with a book in one hand and a drink on the table next to you. Time to…update your patio furniture?
At first thought, this last activity may not seem like quite so much fun, but it can be! When you decide to embrace your own creativity and forego the unnecessary expense of purchasing costly outdoor furniture, you open your mind to a quick, easy, and inexpensive DIY patio furniture project that will provide the perfect setting to make your other summer dreams come true.
Updating and creating new patio furniture doesn’t have to be a hassle or a money-drain. Check out these simple, cost-effective plans you can use today to put together your own DIY outdoor furniture:
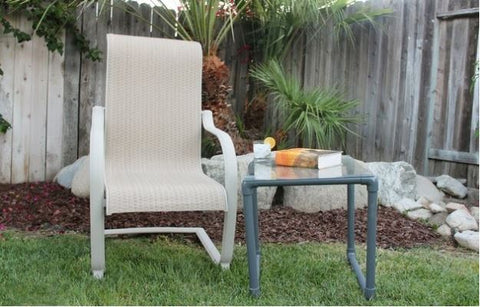
Perfect Patio Table
Approximate Cost: $45
Approximate Time to Build: 2 Hours
Materials:
-
(8)90 Degree Connectors
- (1) 10’ Electrical Conduit
- All-Purpose Weatherproof Silicone Clear Sealant
- 18” x 24” Glass Piece
- Metallic Finish Spray Paint (Optional)
Tools:
Instructions:
- Use your pipe cutter to cut 10” pieces of the electrical conduit, wiping away debris after cutting.
- Using three of the 10” pieces and the 90-degree connectors, make a square with one side open, screwing them into place.
- Repeat the last step, making another square with one side open.
- Lay the unfinished squares on the ground and attach connectors to the bottom of the pipes, facing upwards. Add the last two pieces of electrical conduit between them, joining them together.
- Spray paint the electrical conduit structure a dark metallic color and allow it to dry.
- Stand the base upright and using the caulking gun, apply clear silicone sealant to the top four corners of the table base.
- Place your glass piece evenly on top of the table base, gently pressing down where the sealant is underneath.
- Allow to dry, and then enjoy!
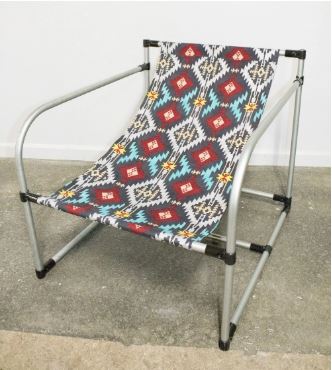
Signature Maker Pipe Sling Chair
You can’t have summer without a comfortable chair.
ThisSignature Maker Pipe Sling Chair is easy to make and the perfect choice for relaxing on sunny, summer days.
Approximate Cost: $65
Approximate Time to Build: 2 Hours
Materials:
Tools:
-
5mm Allen Wrench
- Pipe Cutter
- Tape Measurer
- Pipe Bender (optional)
Instructions:
- Using a pipe cutter, cut four 24” conduit pieces, four 28” conduit pieces, and two 51.5” conduit pieces.
-
Using the pipe bender, make a 90-degree bend in each 51.5” conduit piece. If you didn’t buy the pipe bender, you can also usetwo additionalStandard T Connectors to create the arms.
- Next, it’s time to create the chair’s arms. Use one Standard T Connector to attach a 28” piece to the 51.5” piece. Then, connect another 28” piece to the end of the 51.5” piece and 28” piece, forming a shape that loosely resembles a triangle.
- Repeat the previous step to make the other arm of the chair.
- Using four Standard T Connectors, attach one of the 24” crossbars to one arm. On the opposite arm, place four Standard T Connectors in the same place.
- Slide the fabric sling over two of the crossbars.
- Connect the second arm to the crossbars and tighten everything.
- Enjoy your new chair!
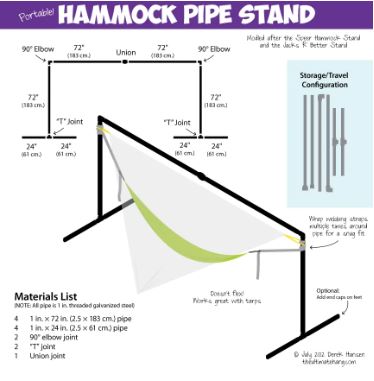
Portable Hammock Stand
Upgrade your patio game with this easy to makeportable hammock stand. Just add a hammock and you will be swinging in a lovely summer breeze!
Approximate Cost: $50
Approximate Time to Build: 2 Hours
Source
Materials
Tools:
- 5mm Allen Wrench
- Pipe Cutter
Instructions:
- Cut four 24” sections of the electrical conduit. Attach two together with a Standard T Connector. Repeat for the other two.
- Cut four 72” sections of the electrical conduit. Attach one to the opening left in the Standard T Connector and the other to the opening left in the other Standard T Connector.
- Add the 90 Degree Connectors to the top of the two 72” sections.
- Attach the remaining two 72” sections to the other side of the 90 Degree Connector.
- Between the 72” sections, place a union joint, and secure it into place.
- Wrap webbing string around the pipe at the height that you would like to hang your hammock. It should be wrapped snuggly.
- Attach end caps to the pipes at the base of the hammock stand.
- Set up your hammock and enjoy it!
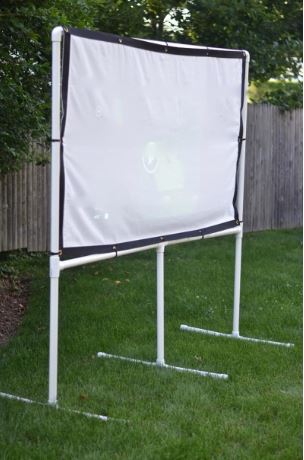
DIY Patio Movie Screen
ThisDIY Patio Movie Screen is awesome for outdoor film nights with friends and family.
Approximate Cost: $30
Approximate Time to Build: 1 Hour
Source
Materials:
Tools:
Instructions:
- Cut the electrical conduit so there is a 7’ piece, two 4’ pieces, two 41” pieces, three 2.5’ pieces, and six 1.5’ pieces.
- Secure the two 90 Degree Connectors to the ends of the 7’ piece of electrical conduit and then attach the two 4’ pieces to their open sides which should be facing the same way.
- Attach two of the Standard T Connectors to the ends of the 41” piece and add another Standard T Connector between them to join them. You should have a rectangle at this point.
- To the open ends of the Standard T Connectors beneath the rectangle, attach the three 2.5’ pieces. Then, add another Standard T Connector to the bottom of those pieces.
- To make the “feet” of the movie screen, add two of the 1.5’ pieces to the openings on the Standard T Connectors. They will be perpendicular to the rest of the structure.
- Secure your sheet or screen around the large rectangular part of the structure with zip ties. Enjoy your movie!
To learn more about our company and products, and to access our helpful tools such as ourQuick Start Guide, offering a breakdown of how to begin and complete your pipe design projects successfully, and ourDIY Pipe Project Idea Gallery, featuring numerous great design ideas, visitMaker Pipe today.
Be sure to check out our interactiveDIY Community page, where satisfied clients share their own innovative ideas for building items with Maker Pipe for a wide assortment of industries and uses!


